How to Replace a Toilet: A Beginner’s Tutorial
Replacing a toilet is a task that many homeowners can handle on their own, provided they have the right guidance and tools. Whether you’re upgrading to a more water-efficient model or simply replacing an old, malfunctioning toilet, knowing how to replace a toilet is an invaluable skill. This tutorial is designed to walk you through each step of the process, ensuring that you can complete the task with confidence and precision. We’ll cover everything from the tools you’ll need to the final checks after installation, making the entire process as straightforward as possible.

What Tools Do You Need to Replace a Toilet?
Before diving into the project, it’s crucial to gather all the necessary tools. The basic tools required include an adjustable wrench, a flathead screwdriver, pliers, a putty knife, and a sponge or towel. Additionally, you’ll need a new wax ring, closet bolts, and possibly a new water supply line if the existing one is worn out. Having a bucket or bowl nearby to catch any residual water is also a good idea. These tools and materials are typically available at any hardware store and are essential for ensuring a smooth and efficient replacement process. With everything prepared, you’ll avoid interruptions and complete the job more quickly.
How to Remove the Old Toilet?
Turn Off the Water Supply
The first step in removing the old toilet is to turn off the water supply. Locate the shutoff and turn the valve behind the toilet clockwise to shut off the water flow. Once the water is off, empty the toilet by flushing it to remove as much water as possible from the tank and bowl. If there is still water left in the tank, use a sponge or towel to absorb the liquid it up. This step is crucial to prevent any water spillage when you disconnect the toilet. With the water supply turned off and the tank drained, you’re ready to proceed to the next steps.
Drain and Disconnect the Toilet
After the water supply is turned off, the next task is to disconnect the toilet from the water line and drain any remaining water. First, unscrew the water supply line connected to the bottom of the remove the tank with an adjustable wrench. Have a bucket or bowl ready to catch any water that may drip out. Next, remove the tank lid and use a sponge to soak up any water left in the tank. Once the tank is completely dry, unscrew the bolts that hold the toilet to the floor. If the bolts are rusted or corroded, use penetrating oil to loosen them. With the toilet now disconnected, you can begin to remove it from its position.
Remove the Toilet and Wax Ring
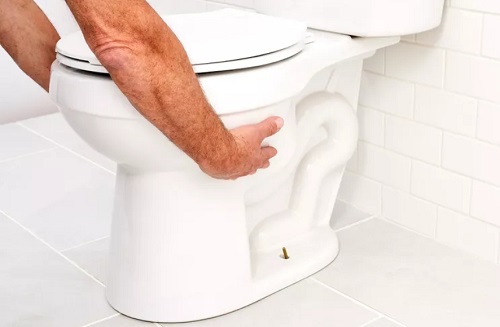
With the toilet disconnected, it’s time to remove it from its position. Carefully rock the toilet back and forth to break the seal of the old wax ring. Once the seal is broken, lift the toilet off the floor and place it on a towel or cardboard to avoid damaging the floor. Next, use a putty knife to scrape off the old wax ring from the floor flange. It’s essential to remove all remnants of the old wax ring to ensure a proper seal for the new toilet. Clean the flange thoroughly, and inspect it for any damage. If the flange is cracked or broken, it should be replaced before installing the new toilet.

How to Install the New Toilet?
Positioning the New Wax Ring
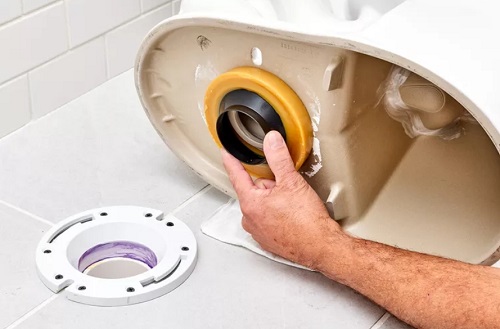
The first step in installing the new toilet is to position the new wax ring. Place the wax ring on the toilet’s outlet, ensuring it’s centered and secure. The wax ring is critical for creating a leak-proof seal between the toilet and the drain, preventing leaks. It’s a simple yet essential component of the installation process. Some wax rings come with a plastic horn for added sealing power, while others are plain. Choose the type that best suits your needs. Once the wax ring is in place, you’re ready to set the toilet onto the flange.
Setting the Toilet in Place
Carefully lift the new toilet and align it with the floor flange. Make sure the bolts on the flange are aligned with the holes in the base of the toilet. Lower the toilet slowly and evenly onto the flange, ensuring the wax ring stays centered. Press down firmly on the toilet bowl to compress the wax ring and form a tight seal. The toilet should sit flat on the floor without any wobbling. If the toilet isn’t level, use plastic shims to adjust it. Once the toilet is positioned correctly, you can move on to securing it to the floor.
Securing and Connecting the Toilet
With the toilet in place, it’s time to secure it to the floor. Tighten the bolts on either side of the toilet base using a wrench. Be careful not to overtighten, as this can crack the porcelain. Once the bolts are secure, reconnect the water supply line to the base of the tank. Turn on the water supply and let the tank fill. Check for any leaks around the base of the toilet and the connections. If everything is secure and leak-free, give the toilet a test flush to ensure it’s functioning correctly.
What to Check After Installation?
Testing for Leaks
After installing the toilet, one of the most important checks is for leaks. Carefully inspect the base of the toilet and the water supply connections for any signs of water. Even a small leak can cause significant damage over time, so it’s crucial to address any issues immediately. If you find a leak, try tightening the connections slightly. If the wax ring was not properly sealed, you might need to remove the toilet and re-seat it with a new wax ring. Ensuring there are no leaks will give you peace of mind that the installation was successful.
Ensuring Proper Flush
Next, you’ll want to test the toilet’s flush. A properly installed toilet should have a powerful flush that clears the bowl completely. If the flush is weak or the bowl doesn’t empty as it should, there might be an issue with the fill valve or the flush mechanism. Adjust the water level in the tank if necessary, and check for any obstructions in the bowl or drain. This step ensures that your toilet operates efficiently and reliably, preventing future problems.
Final Adjustments and Cleanup
Finally, make any necessary adjustments to the toilet’s position or connections. Once you’re satisfied with the installation, clean up the area by removing any debris or tools. Dispose of the old toilet and wax ring properly. Wipe down the new toilet and the surrounding area to remove any dirt or dust. A clean, properly installed toilet is the final result of your efforts, and you can now enjoy the satisfaction of a job well done.
Conclusion
Replacing a toilet may seem like a challenging task, but with the right tools and a clear guide on how to replace a toilet, it’s entirely manageable for most homeowners. By following these detailed instructions, you’ve successfully completed the installation and can now enjoy the benefits of a new, efficient toilet. Remember to check all connections thoroughly and ensure the toilet is functioning properly before considering the job finished. With careful attention to detail and patience, you’ve not only saved money on a professional plumber but also gained valuable DIY experience.
FAQ:
1. How long does it take to replace a toilet?
Typically, replacing a toilet takes about 2-4 hours, depending on your experience and the condition of the old toilet and plumbing. For beginners, it might take longer due to the need to familiarize yourself with each step.
2. Do I need a plumber to replace a toilet?
While it’s possible to replace a toilet yourself with proper guidance, hiring a plumber can be a good option if you’re uncomfortable with plumbing tasks or if complications arise during the installation process.
3. What should I do if my new toilet leaks after installation?
If your new toilet leaks, first check the connections and the wax ring. Tighten any loose connections and ensure the wax ring is properly seated. If the leak persists, you may need to replace the wax ring or consult a plumber to ensure a proper seal.
